whatwasitagain - a place for things that one might forget
Mastodon @adingbatponder@fosstodon.org
email: adingbatponder@proton.me
telephone: +49 151 50 42 27 39 (EN, DE, FR spoken)
March 2024
"A foolish consistency is the hobgoblin of little minds, ..." R. W. Emerson
This website is hosted by nginx on Ubuntu 20.04.3 LTS server using rapberry pi hardware, following the Kindle book 'Selfhosting: Server aufsetzen und betreiben' by Florian BOTTKE, see chapter on web server.
meshtastic
I have joined the meshtastic bandwagon. It is a network, or mesh, of radio "nodes", using 868 MHz in Europe, that automatically forwards text messages through the radio network from one node to the other in a series of "hops". Here is a node map. The messages are passed in chat-goups called "channels", and messages are best written and read using the meshtastic app on a smartphone, which serves as the interface with the radio node device via bluetooth. See link above for further technical informatoin and lists of available and supported radio node devices.
I think the idea of having a consumer-level text messaging network that functions (in a rudimentary way) fully independently of there being other infrastructure, due to being is own radio mesh, is an amazing project. The project is really attractive because it allows people genuinely to particiapte in creating a communications network that is independent of the usual big infrastructure (internet providers, telephony, 5G phone network, etc.). This is a wonderful learning process and motivational because it shows how far one can go at the grass roots with the tech we have. The main problems are that one needs a lot of people taking part for it to work, otherwise messages simply do not propagate. The way to get going in the interim is therefore to use an internet connection via the MQTT setting in the meshtastic app on your smartphone, to be able to see loads of people on the main default public channel called "Longfast".
A video showing how to setup the meshtastic kit is here.
The following images show my lilygo T-beam ESP32 device with a technikkram antenna, and its frequency performance characteristics. Lilygo node with technikkram antenna connected. Lilygo node with technikkram antenna connected, close up image. Lilygo with technikkram antenna connected in its provisional case, i.e. the box it came in. Lilygo with battery and antenna disconnected. nanoVNA analyser. nanoVNA analyser showing some of the technikkram antenna frequency response data. The antenna was mounted, as it best, on a metal sheet for this measurement. I have tried several antennae and none has a fabulous response at 868 MHz, but the technikkram one worked for me. A Moxton antenna test is shown here, and a an Eightwood antenna here. nanoVNA analyser menu tree.
I only once got a purely radio contact with this setup, and that was in an area with more nodes that my home town. The rest of the time I need to have the MQTT setting in the meshtastic app switched on to see nodes all over Europe.
Many people try to make nodes run on solar power, so that when there is no other infrastructure, the devices can still communicate and relay the messages.
The main problem with the meshtastic channels approach is that if a message is NOT passed on it is simply is lost: there is no central server that stores the messages for sending when there is a node connection. If you want to know if the message was seen in the channel by someone then you have to ask for someone to confirm manually. It is a lot like CB radio in that sense. The whatsapp blue ticks, showing if a message has been received and seen by an individual, are totally lacking. One also has to get used to only having intermittent reception and trasmission because in practice the number of nodes locally varies and often your location puts you too far away from any other node. On the hardwear side, the current devices tend to be bare bones circuits, and the housings often have to be sourced separately, often via 3D printing.
The range you can get on a typical antenna on a meshtastic node depends, in practice, a lot on the height from which you are receiving / transmitting. So a lot of people try to mount fixed antennas as high as they can at home, typicall uses ones like this. I cannot easily clamber on my roof to mount an antenna, and was not yet able to find anyone to do it for me. I intend to send up a node on a drone just to test for fun. For that I intend to use parts available from RAK wireless. The plan for a solar setup intends to use this charger and this solar panel, which is a bit large really. These same items might be available from here, (but one needs to contact them by email if your delivery location is not listed on the site).
The use of the meshtastic site to flash the LILYGO T-Deck ESP32-S3 seems to require the device to be switched on with the on-off switch, while pressing the central button and also the small left-hand side button.
No risc no fun - Fedora on RISC-V computer
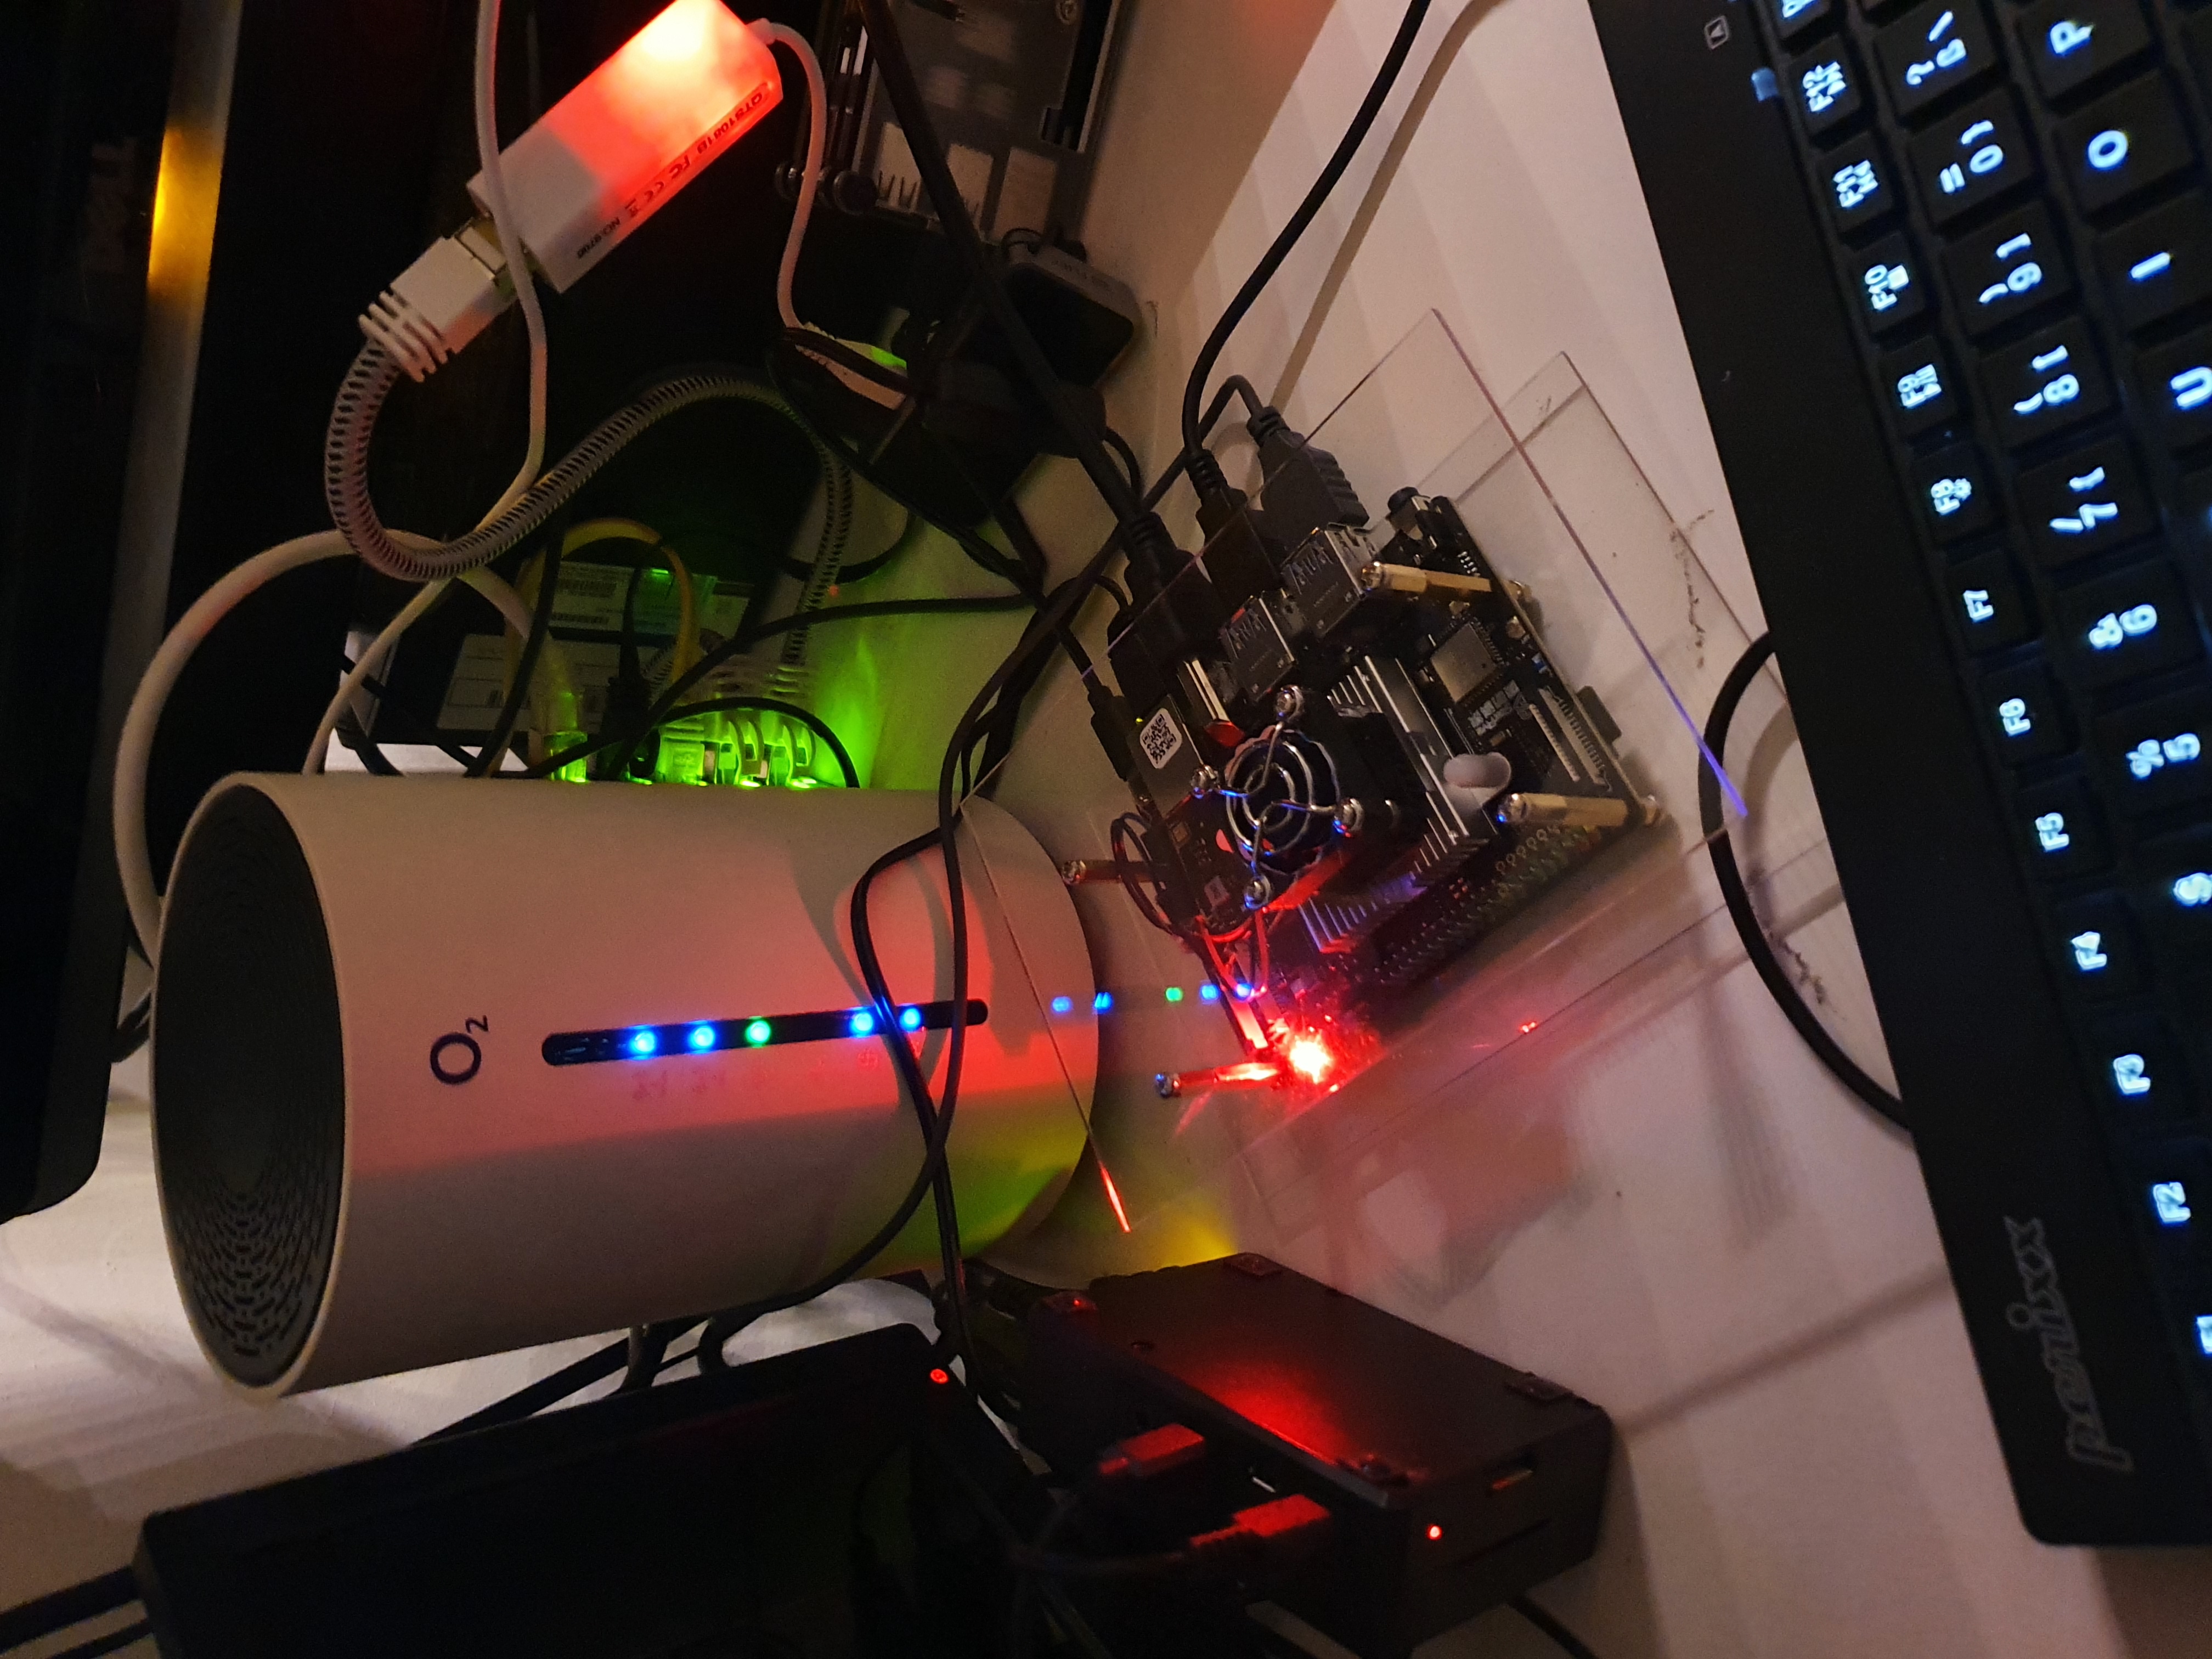
Cellular network internet connection using o2 spot
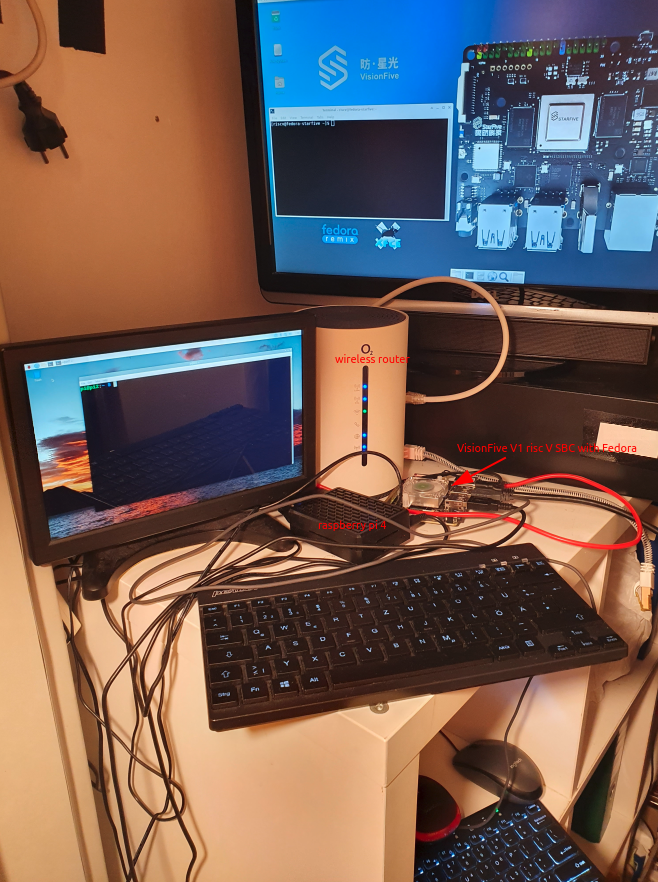
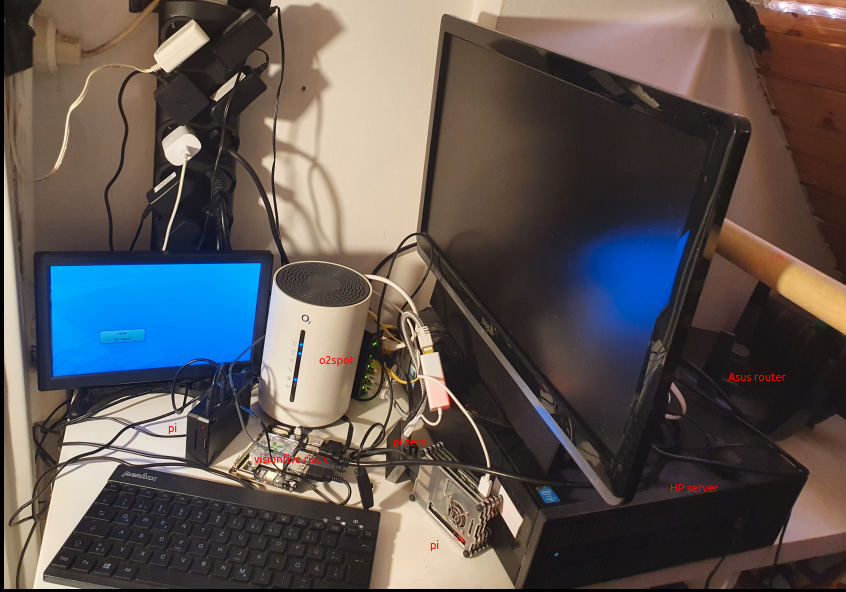
An o2spot LTE/3G router can be used to link a raspberry pi to the internet. Any old cupboard will do to house the pi. The peripherals (keyboard, mouse, screen) are only used in the setup phase and then removed, the device being used "headless".
The o2spot router uses a sim and the cellular network. The data download and upload speeds (10 and 2 Mbit/sec respectively) are easily sufficient for accessing the device via ssh.
The reason for using a separate router like this, instead of connecting the pi to the home wifi network, is to keep the pi separate from the home network in case there is a hack or malware. The device is in quarantine by being on a separate network.
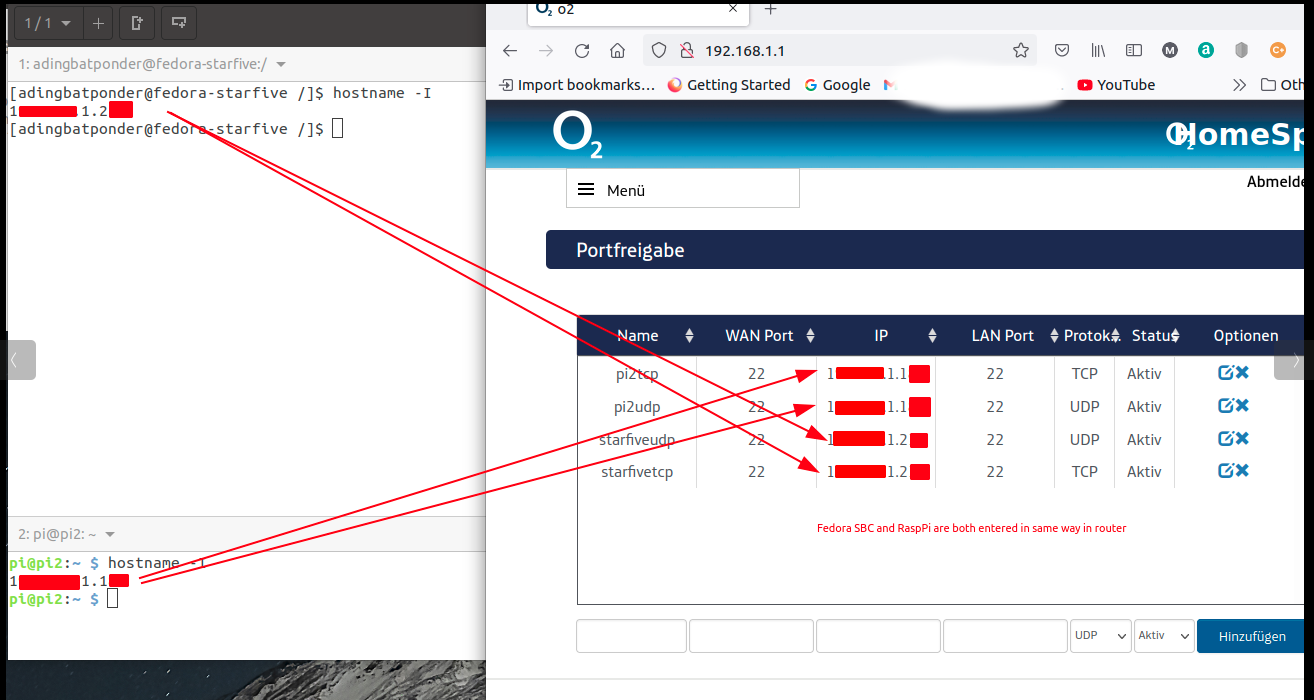
To access the raspberry pi via ssh from the home network, i.e. a different network, the o2spot needs to have port a WAN port open and forward this to port 22 on the computers.
For this o2spot router, this can only happen if the router has a public IP address. To get a public IP address call o2 and they will arrange this for a fee.
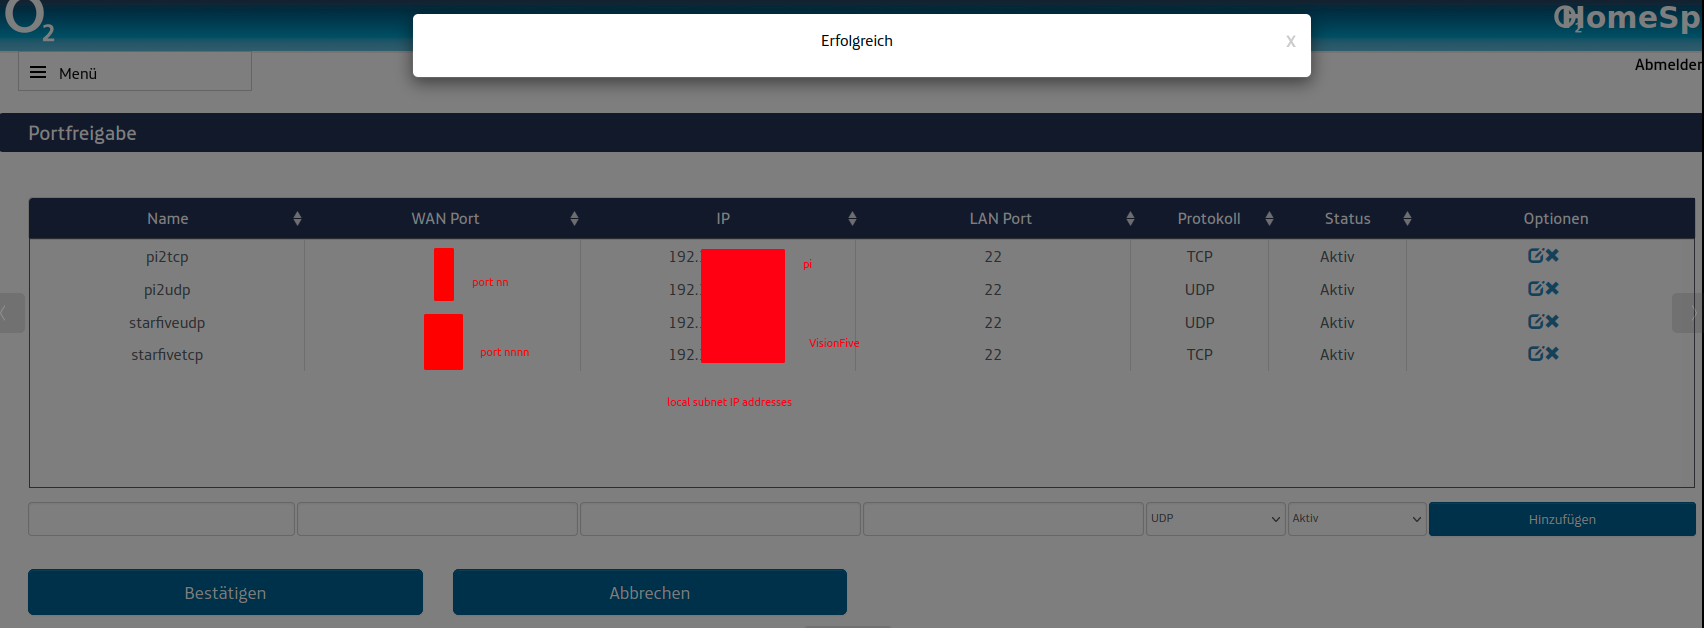
After a few hours the o2spot router will receiev an SMS, visble in the GUI control center of the router. The GUI is accessed via the LAN ip address of the router when connected locally to that network. Then you can go ahead and set the ports under LTE/3G modus - Sicherheit - Portfreigabe.
Set the ports as shown here.
The commands to get the ip addresses are shown here.
The access works fine even via a VPN. Public IP address changing every day
Unfortunately the public IP address of the o2 spot router is not fixed, and changes every day. Perhaps this is best for security. I really need to know what the public IP address is when it changes without having to log onto the computer itself, otherwise I cannot leave it headless. This link provides a means to be alerted by email automatically when the IP address changes: meaning the Raspberry Pi and the VisionFive can be run headless from an external network using their new public IP address, because there is no need run any command (e.g. curl ifconfig.me) from a terminal on the machine or by ssh on the local network. Following the instructions, including using an AppPassword for a googlemail account worked superbly, but only the crontab did not work immediately. This link can help with the crontab setup if needed, and this is good on permissions. To make controntab work, I had to change permissions: root@pi2:/opt/ipwatch# chmod u=rwx,g=rwx,o=rwx ipwatch.py
and also changed the crontab instruction from
00 * * * * etc.
to
0 * * * * /opt/ipwatch/ipwatch.py /opt/ipwatch/config.txt
in the file
/tmp/crontab.4IMiGM/crontab
which is the default used when running
root@pi2:~# crontab -e
to edit the crontab (done as root).
With systemctl status cronthis is the status, and this site explains some of the messages. The emailing of the new IP address works fine.
I am wondering if a MTA can be installed in the Pi, and used to make a much easier python script than the one linked above (which seems rather complicated) that checks an IP change using ifconfig.me on a regular basis and then uses the MTA. There should be a simpler way of doing this via a dyndns server such as dynu which, with a suitably installed code on the computer, will keep the DNS server automatically informed of the IP address change and then one can use a domain name to log in, instead of the constantly changing IP address. Following those instructions and using apt-get install ddclient which launches a series of input screens in the terminal, and trying it again (following some error messages like this in some input screens) with sudo dpkg-reconfigure ddclient and using the option for a separate so called "IP update password", a file /etc/ddclient.conf was generated. Ran sudo systemctl start ddclient.service but looks like I will have to rummage here in github. So this command ddclient -daemon=0 -debug -verbose -noquiet shows there is a permissions denied problem witht the .conf file which has the following permissions -rw------- 1 root root 184 Apr 20 00:00 ddclient.conf
which I changed like this:
sudo chmod u=rwx,g=rwx,o=--- ddclient.conf
and also
pi@pi2:/var/cache/ddclient $ sudo chmod u=rwx,g=rwx,o=--- ddclient.cache
which seemed to remove the permissions problem (at least once), though can't think why.
Initially I stupidly tried putting my o2 spot router settings to be the same as the ddclient settings, but this was a red herring - the DDNS on the o2spot router is deactivated and not used.
My ddclient settings reported the following error:
WARNING: file /var/cache/ddclient/ddclient.cache, line 3: Invalid Value for keyword 'ip' = '' RECEIVE: badauth FAILED: updating xxxx.com: badauth: Bad authorization (username or password)
Using this link's example ddclient.conf might have helped, but did not.
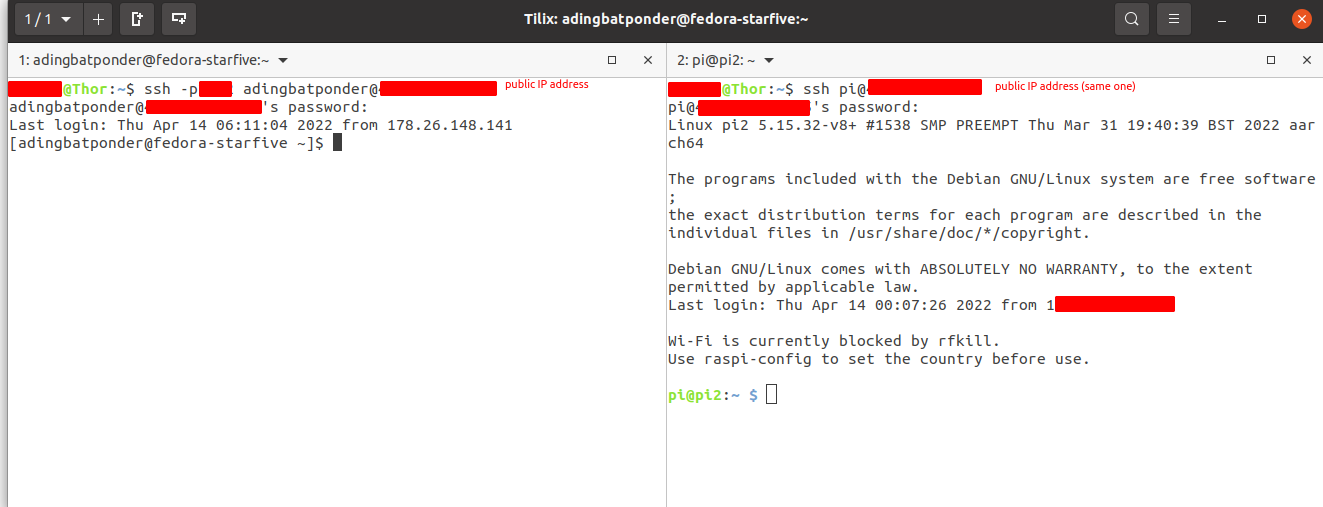
Typing the public IP into the relevant field in dynu.com DDNS GUI website settings permits access immediately to the computers connected to the o2 spot using the domain name. Thus there was a problem with ddclient. It was set up using the wrong server domain name. Using "api.dynu.com" as the server in ddclient.conf seems to be what fixed it, and now the ddclient.conf file that works looks like this and the command ddclient -daemon=0 -debug -verbose -noquiet yields the following output. Note that the ddclient.conf file generated by the process of data entry after running apt-get install ddclient was no use. A login via ssh is now possible into both the raspberry pi as shown here as well as the VisionFive RISC-V via the same domain name, as shown here. Waiting till the following day after an IP address change by the router showed that the dynu.com DDNS service was successfully updated and shh via the domain name works after the IP address of the o2spot router has changed. ssh via a smartphone also works nicely using the app JuiceSSH.
sshenanigans fail2ban
If you have iptables installed, which you can check with iptables -L, this link explains installation of fail2ban for the rasperry pi and this link shows you how to install fail2ban for fedora (but the visionfive Fedora 33 did not require sudo dnf install epel-release -y as specified in that link). fail2ban protects your ssh connection/port from attack and is essential.
The project plan
Update in September 2022: there is a StarFive VisionFive 2 arriving... woopee.... for which a full Ubuntu OS is available from Ubuntu. Superstars.
This board can be gotten via kickstarter. Will Europe ever catch up with China again?
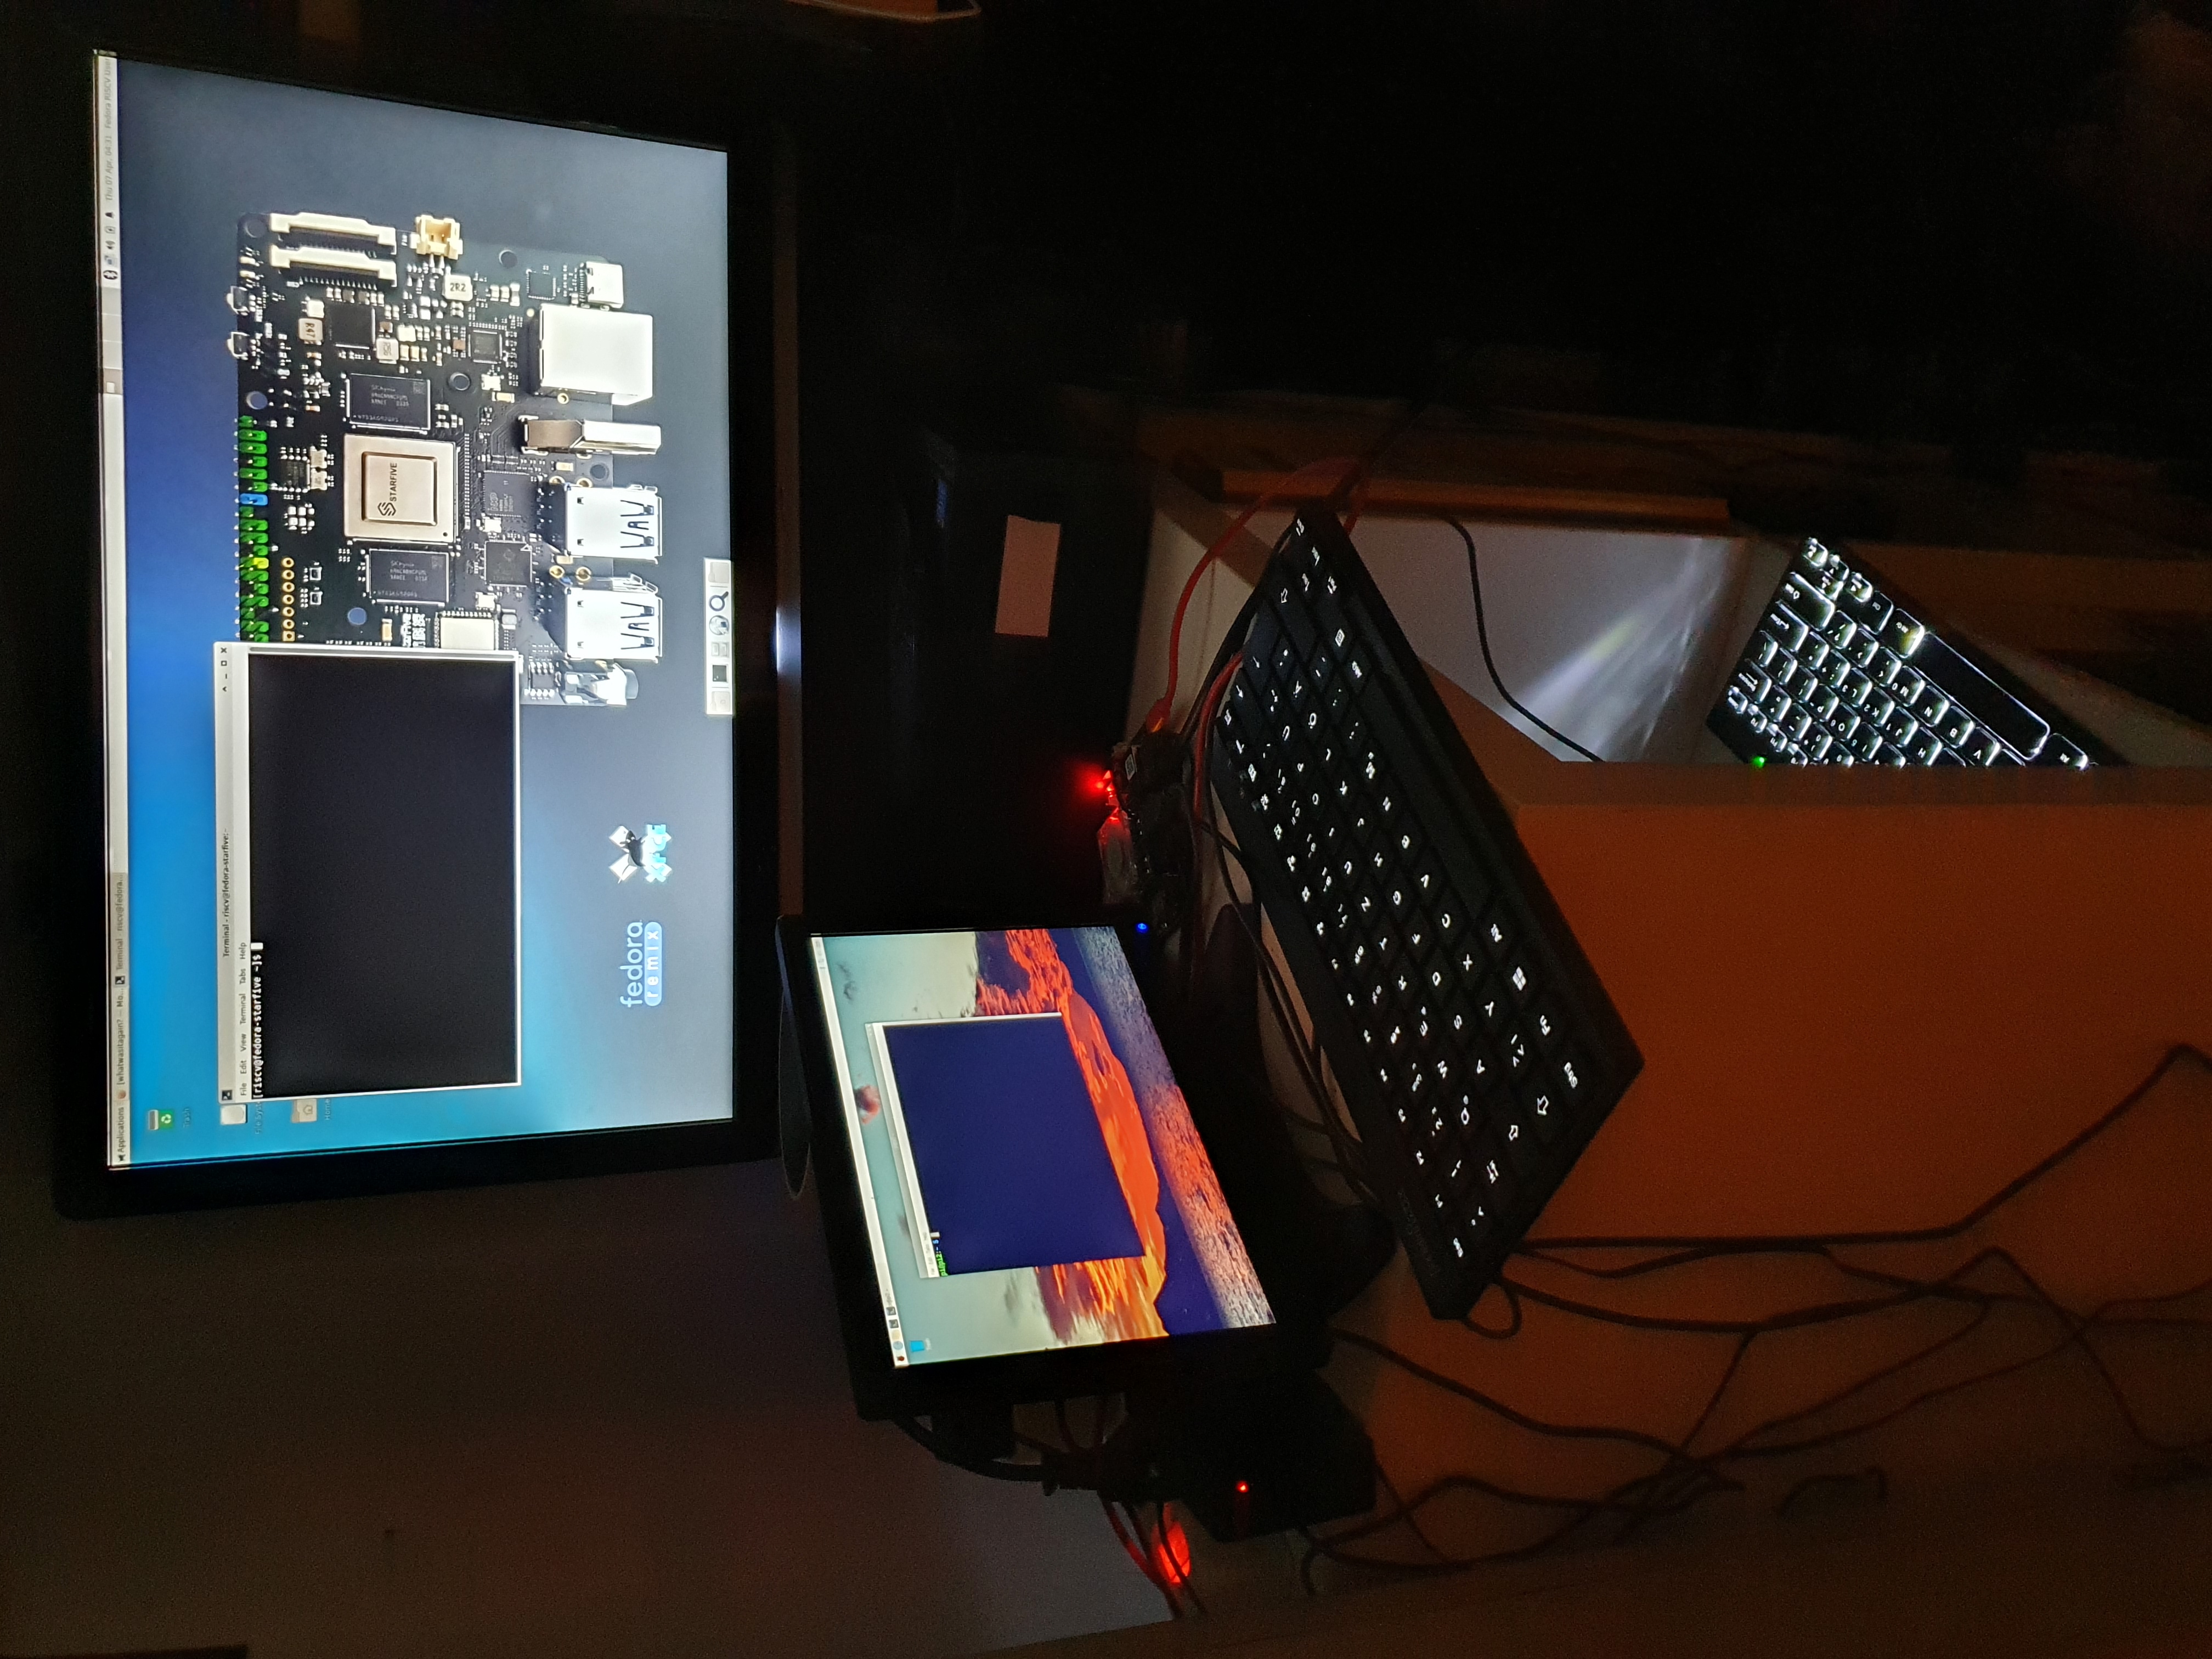
The plan is to compare one of these, a VisionFive V1 Risc V single board computer (SBC) (and the updated version 2, see above) with the pi. Here they are head to head in that cupboard and getting on well, or be it a bit of a squeeze.
The VisionFive is a RISC-V single board computer that can run Fedora linux. It comes direct from PRC with a flash drive with Fedora already installed, though it can be gotten off GitHub. The device is open source from the OS to the instruction set architecture (ISA) due to using RISC-V. This is a big deal (in my opinion).
The above way of connecting it to the internet via the o2spot quarantines the device from my home network and computers, while the provenance of the software, though open source, is being tested.
In case anyone was wondering why the abundance of caution, this nightmare story is a perfect example of the issues involved.
ssh to two different computers on the same router - WAN settings
For some reason I at first was not able to ssh into the VisionFive directly, though I could ssh into the PaspPi. My wrong router settings were these. This is a thread about this ssh issue, and here is another. There it was pointed out that I need to set a different WAN port e.g. nnnn for the VisionFive in the o2spot router, as shown here, and then ssh using the command:
ssh -pnnnn username@publicipaddress
That indeed works, but it is not clear why it was always the PaspPi that connected OK and never the VisionFive when the same WAN port was incorrectly used for both... never mind.
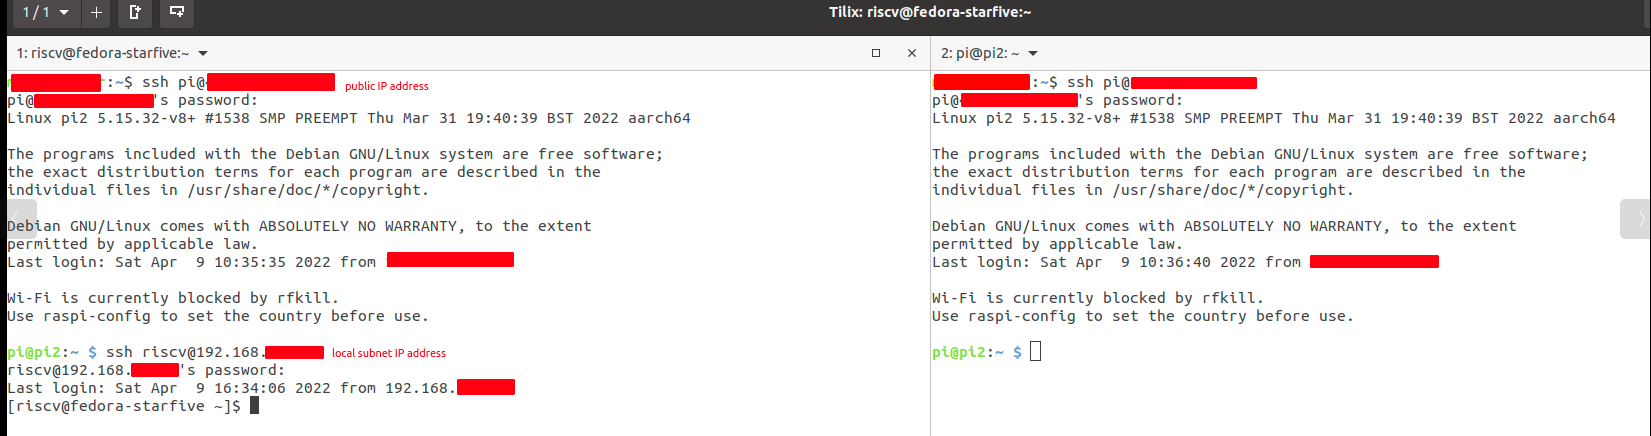
(A work-around was to ssh into the pi public IP address from an external network, and ssh to the VisionFive from the RaspPi.)
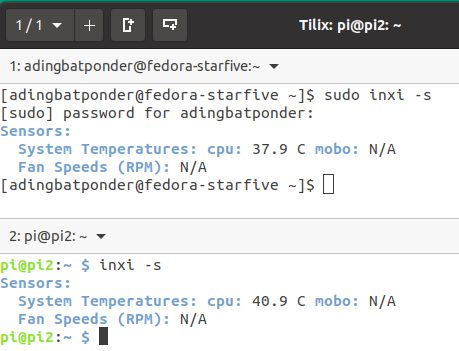
Using Tilix I can then have a RaspPi terminal via ssh, and also a VisionFive terminal via ssh next to each other for testing, see screenshot. That way I do not have to spend all my time in that cupboard!
The only remaining issue is to work out why the ssh connection/s simply time/s out all the time....
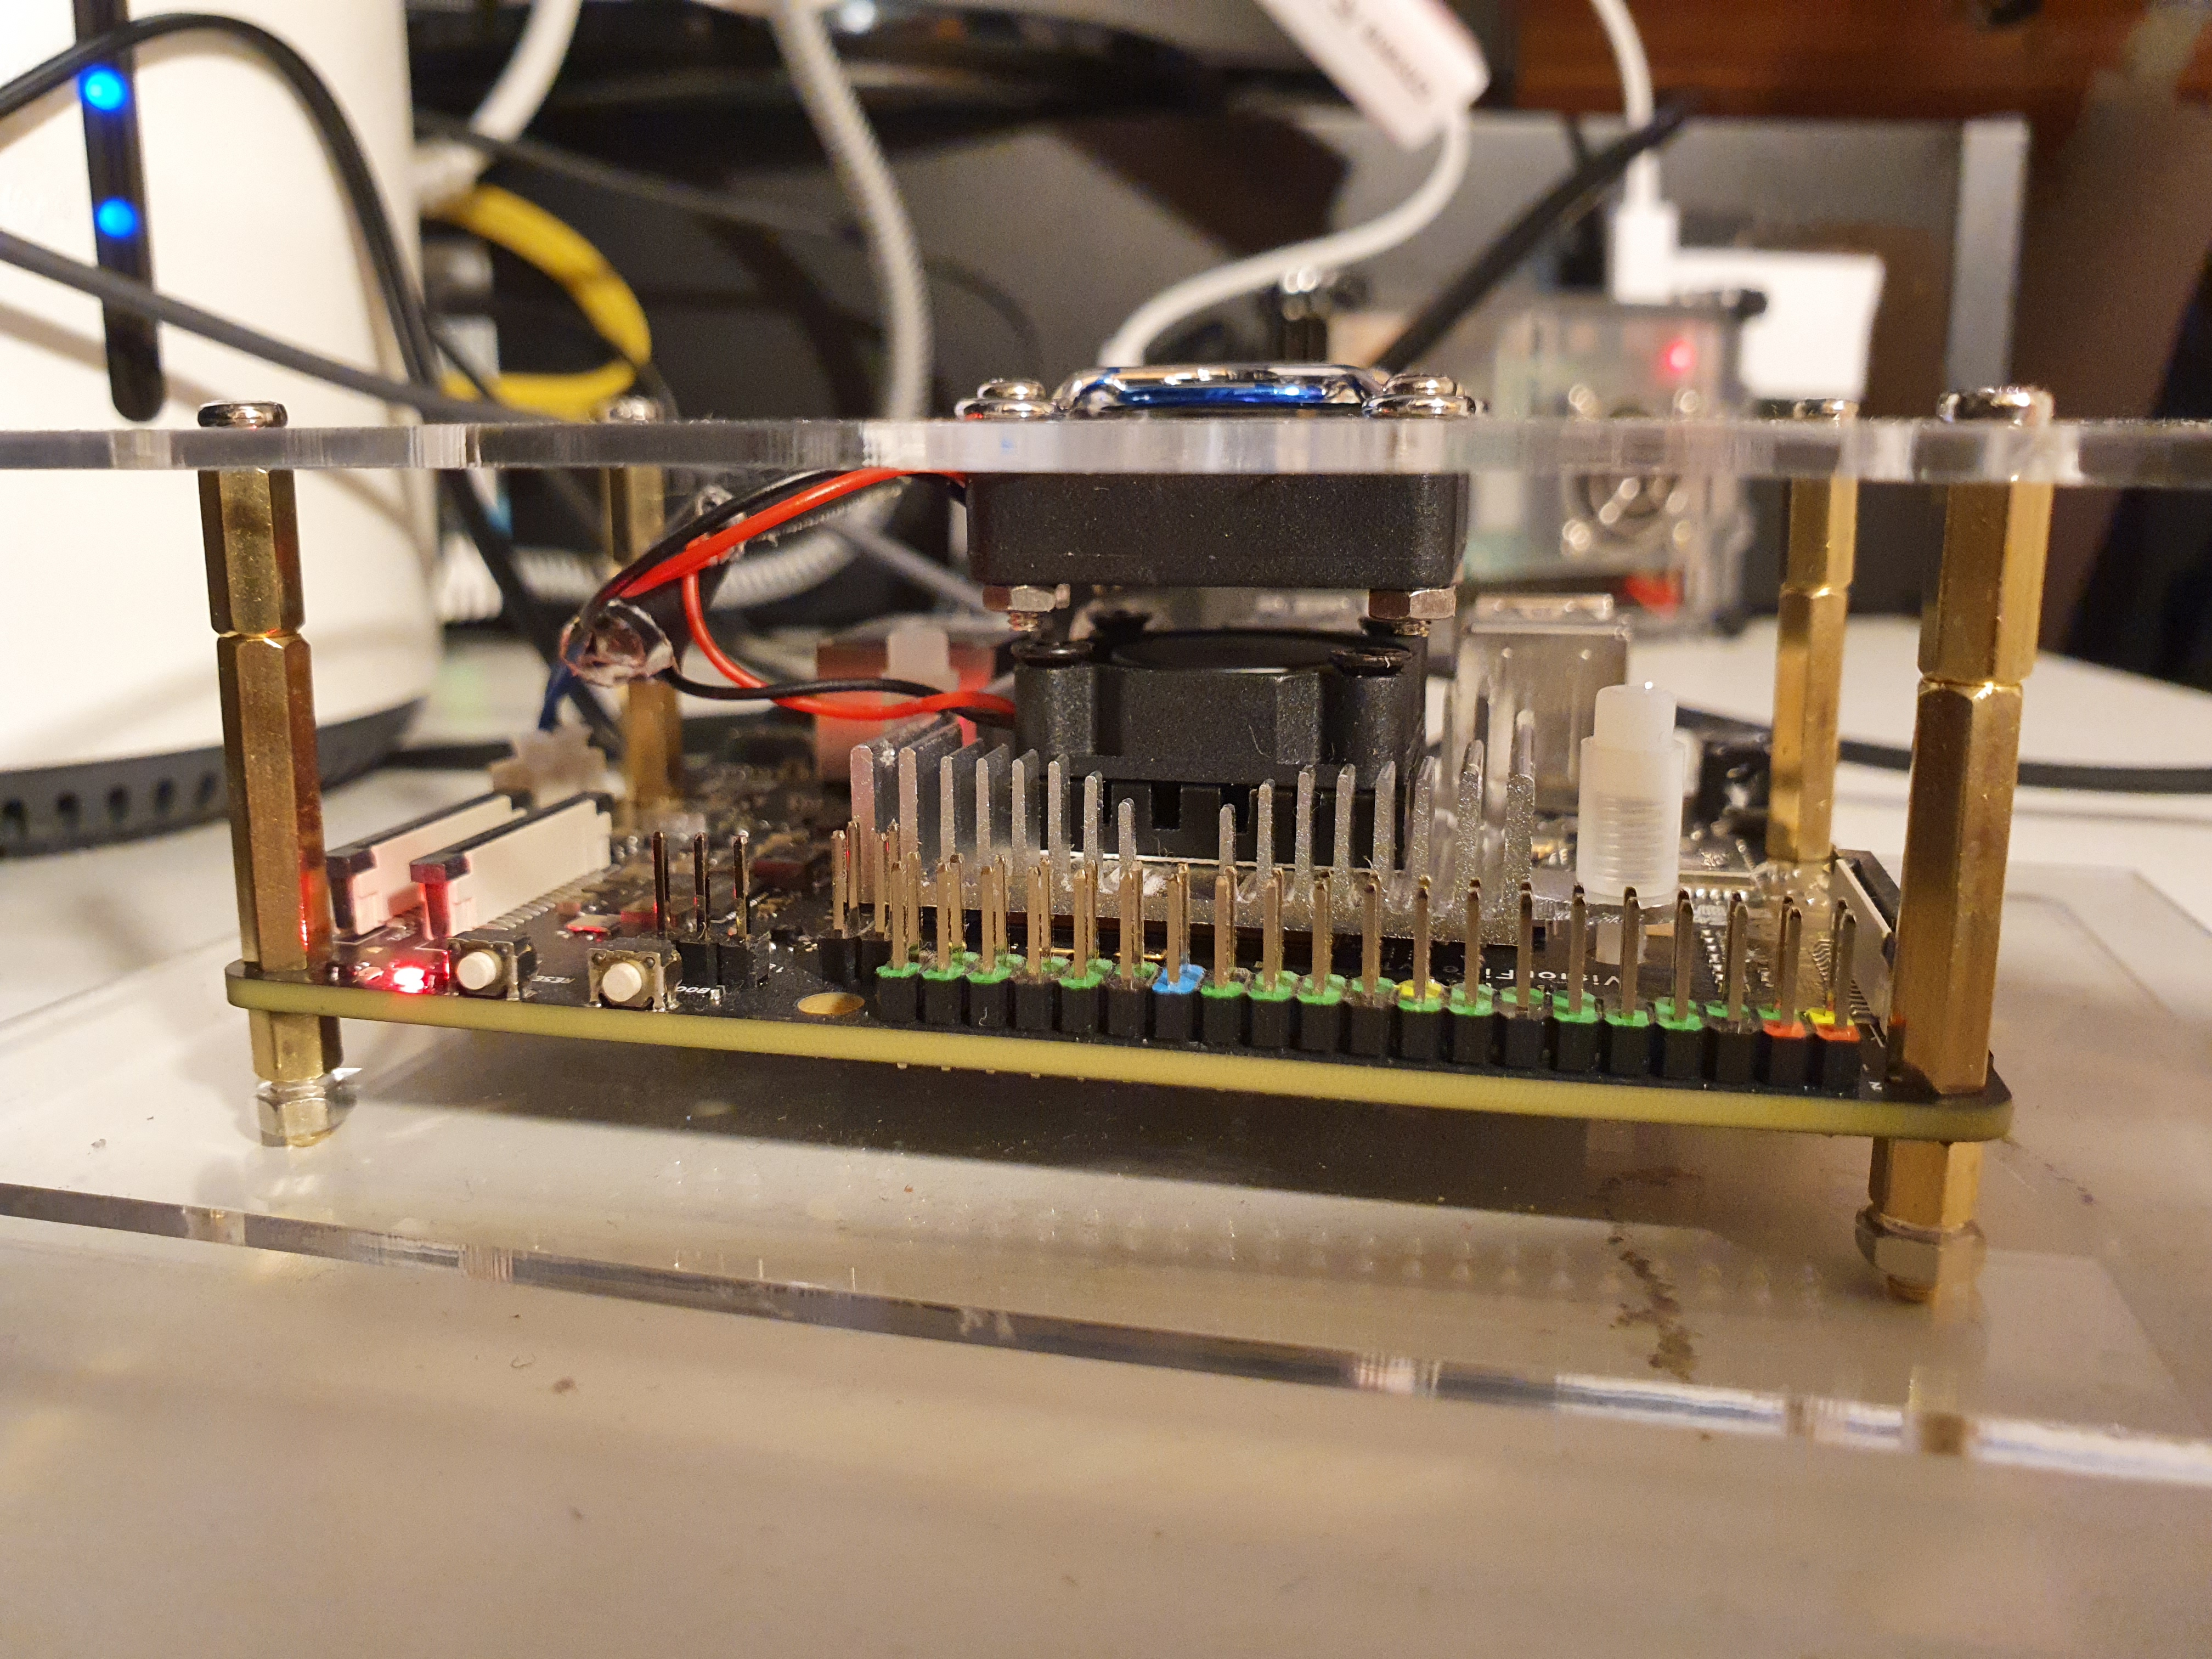
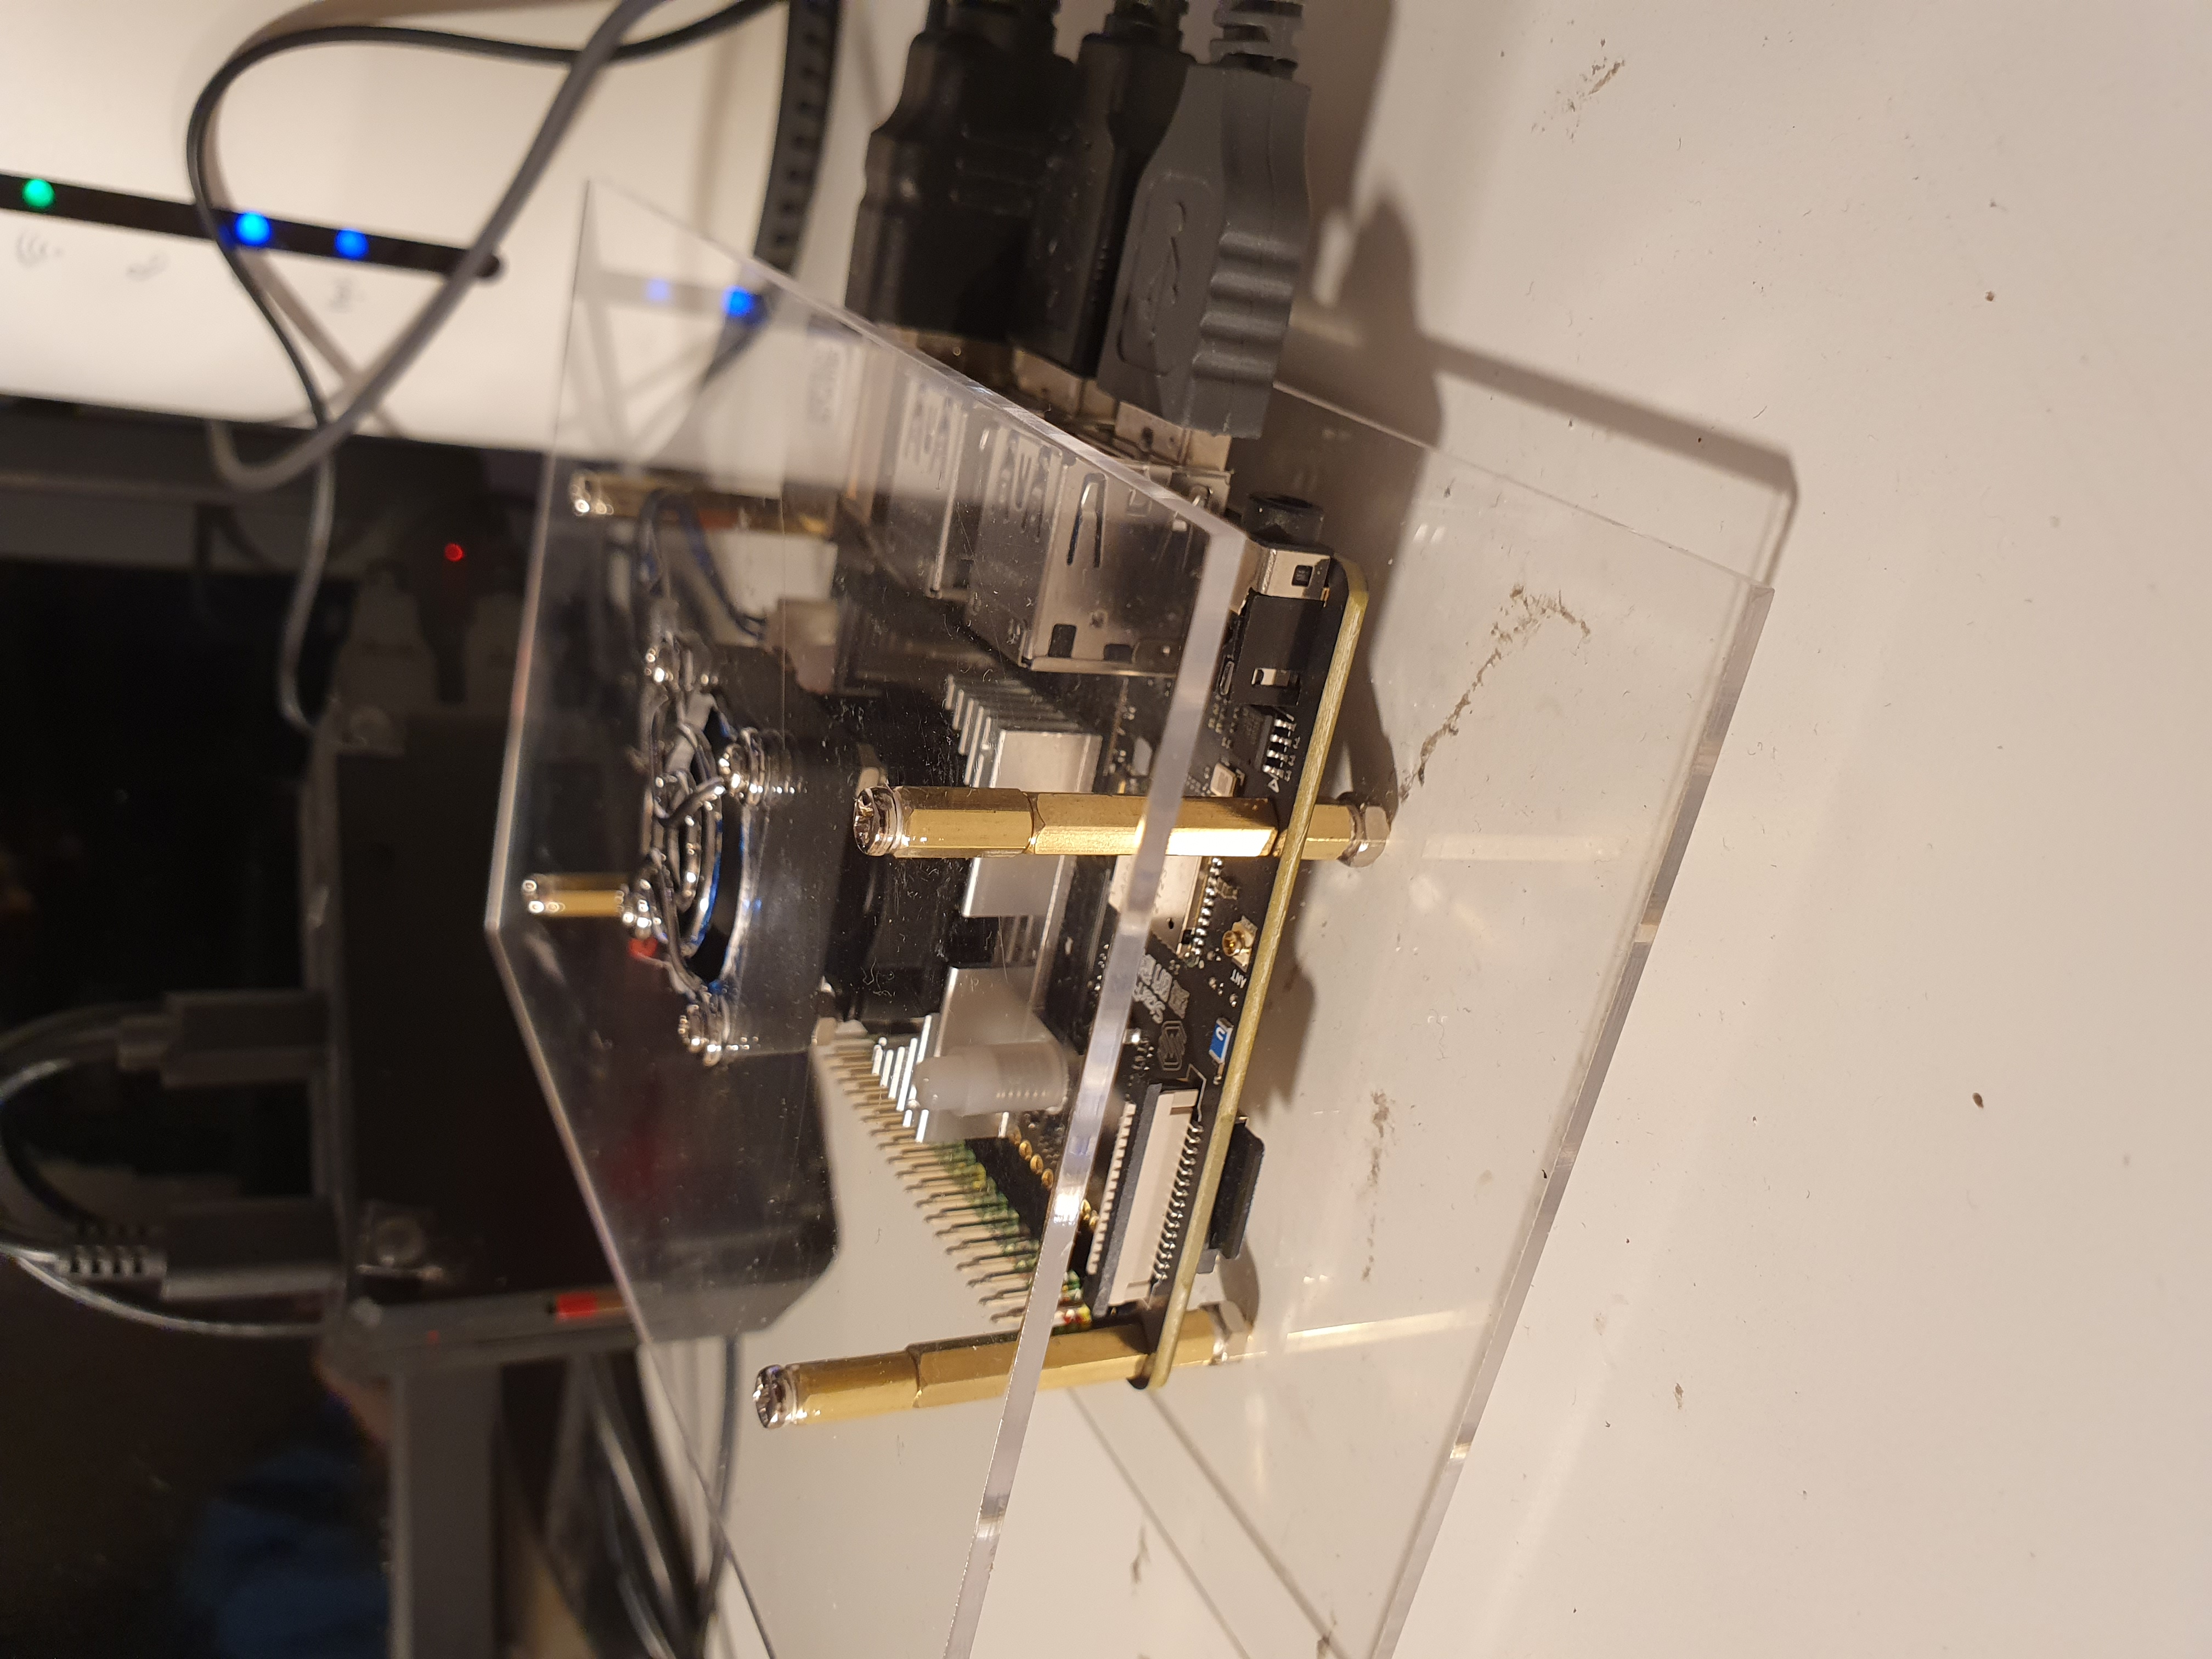
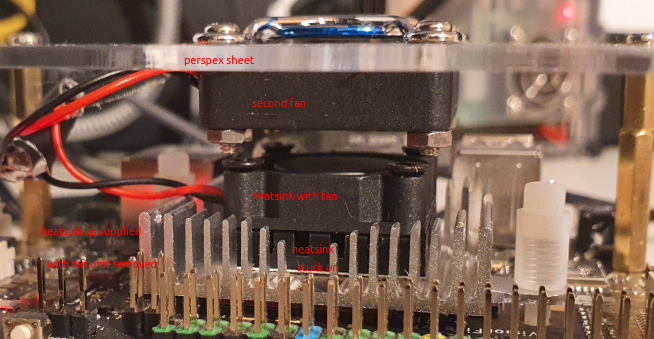
Case and cooling the visionfive quietly
The heatsink with fan (link to store) that was supplied with the visionfive cooled the device very well, but made an infernal noise. I wanted the visionfive to be in some sort of case to protect against damage. Using perspex sheets and M3 spacers one can make a case open at the sides. Using a heatsink with fan (link to store) and another second fan (link to store) I was able to cool the visionfive processor but without all the noise. The heatsink that was supplied was kept, but the loud fan removed, and in place of removed fan the heatsink with fan was stuck onto the supplied heatsink, and the second fan mounted under a large hole made in the top plate of the housing. I have the same fan on the case of the raspberry five running this web-site and it works very quietly and for a long time without problems. The two fans' leads were soldered (keeping plus wires connected to each other) to the wire from the fan socket (the fan socket was not compatible with the plugs on the two fans). Without two fans, but only the fan with heatsink installed, I found that the temperature of the processor reached 55 deg C when the top of the case was in place (with only a few 3.5 mm diameter holes drilled in the top of the case). Thus I decided to place a second fan in the top of the case with a much larger single hole for the fan intake. With the two fans arranged as shown here it was well below 40 deg C, about 38 deg C. There is no reason to believe the device required this amount of cooling, but I thought that it would be interesting to compare the measures needed to cool the visionfive with the fan-less design of the raspberry pi. The raspberry pi runs fanless in a closed aluminium case (shown below) at about 40 deg C, and the two-fan set-up described above at about 38 deg C, as shown here. The noise from the two fans is much less loud and less penetrating in tone than the noise from the single fan as supplied.
visionfive risc-v single board computer with home-made case and replacement fansRunning comparison tests in python.
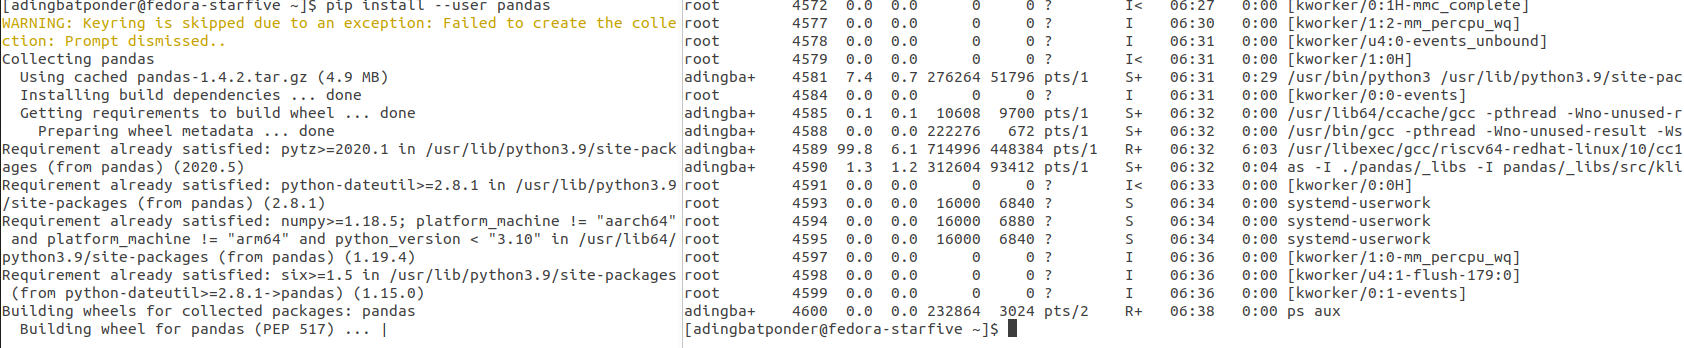
1) Use this timing code. The VisionFive has considerable trouble installing pandas, over a slow internet link, but gets there slowly.... it seems, but the CPU had a
hard time of it.
The better command is, because it is Fedora: dnf install python3-pandas
which works perfectly, as shown by the resulting message which mentions the library is for RISC-V - lovely Fedora !
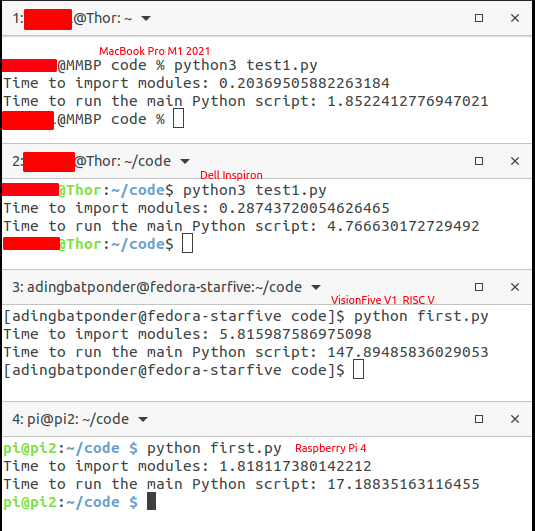
Timing test: generating 10,000,000 integers in range 1 to 9999 and convert these to text (using the above link's timing code). The raspberry pi 4 was about 9 times faster on average, as shown below. The pi does have 2 extra processors, it should be noted. A Dell Inspiron and MacBook Pro M1 2021 is also thrown in for good measure.
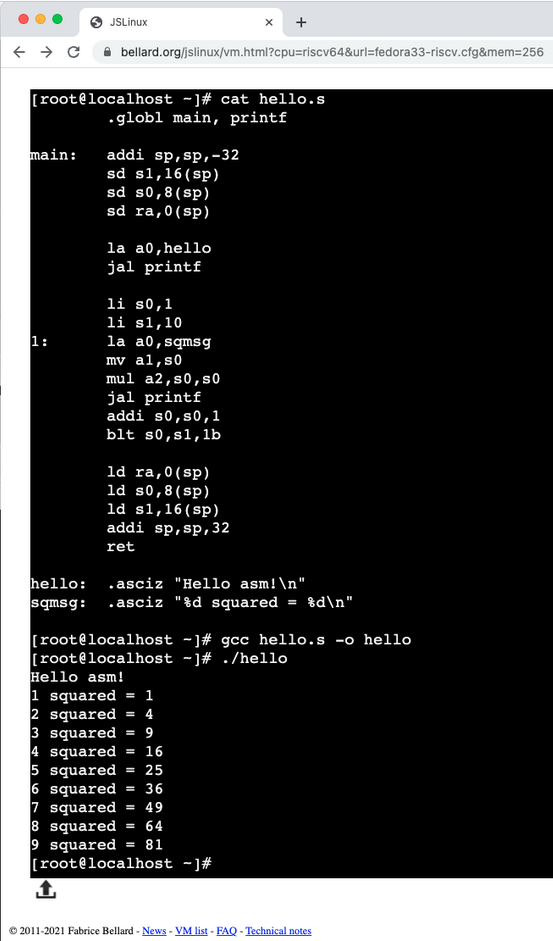
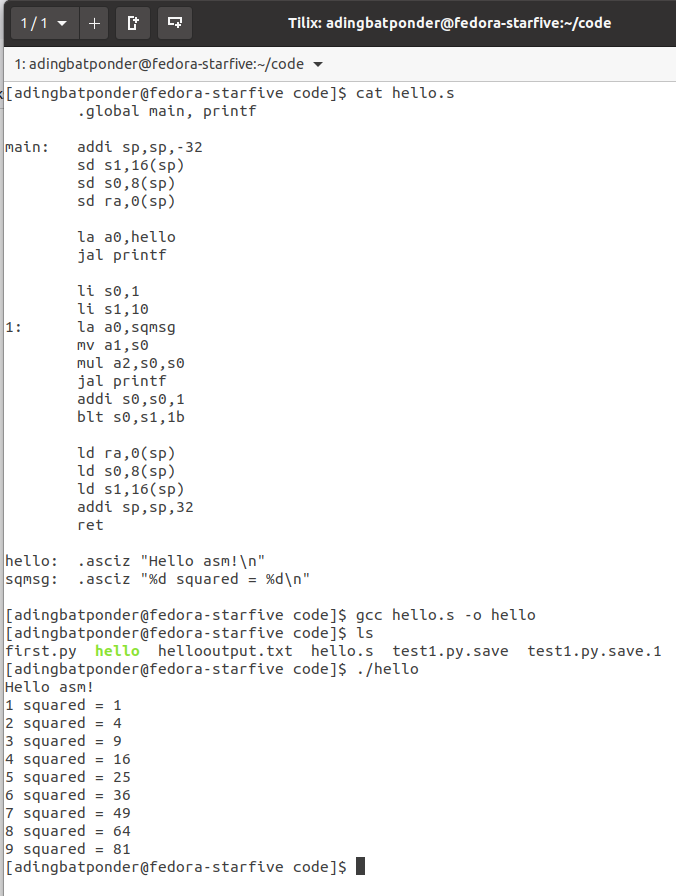
2) This link very kindly provided by Bruce Hoult, shown below, indicates the potential way using RISC-V assembler direcly on the vision five, rather than using an emulator. Bruce mentioned "Note that using .S for the file name instead of .s allows you to use the C preprocessor in your assembly language source code. This can be useful for conditional compilation and defining constants and other macros.". He also explained that 1b in the line blt s0, s1, 1b is a local symbol name referring back to the loop labled 1, as explained in the GNU manual here. The code is available on github.
Lo and behold, the assembler routine above works on the visionfive.
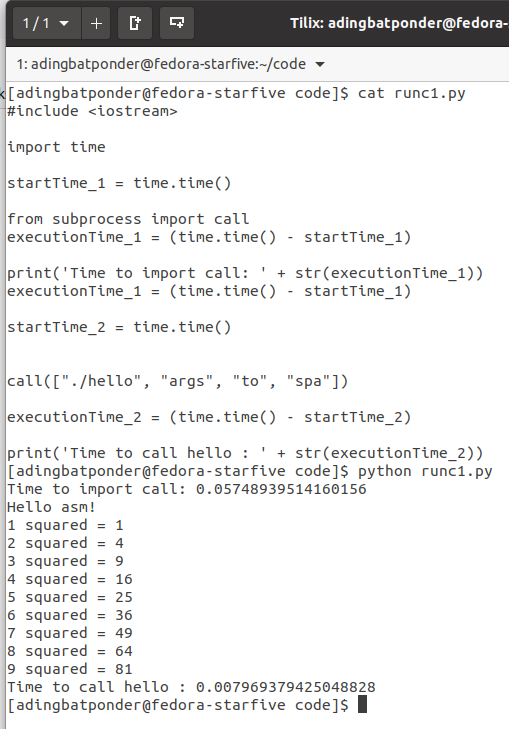
To run a c program from python is explained in this link.
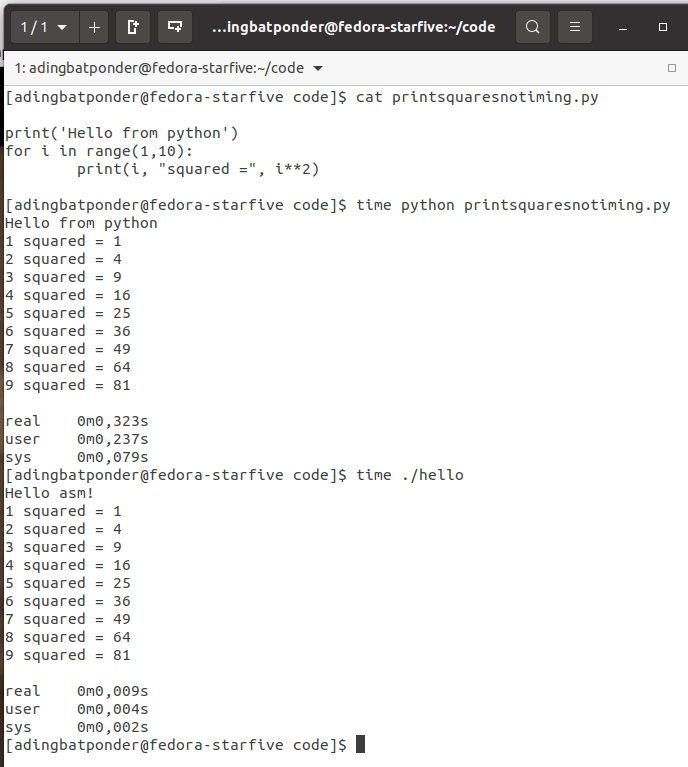
To time the complied assembler code I use this python file.
The output is shown below.
A head-to head shows calling compiled assembler seems not to be faster that python directly
In fact re-running the python that uses a call to the complied assembler often yields about 0.012 seconds, and the python code is never more than 0.0039 seconds, sometimes 0.00066 seconds.
To compare the speed of python in the visionfive with the speed of python in the raspberry pi, see here, which shows that for this the raspberry pi is, as in the above tests, of the order of 10 times faster than the visionfive.
However using the built-in bash time tool yields totally different data indicating that running the compiled binary "hello" is faster, which begins to make more sense:
Further assembly programs are available here and here and here.
RISC-V assembly
Here is a nice RISC-V project site. Anthony Shaw has written a detailed description of the use of assembly in python, with code available in Github.
PeachPy on Github.
How to write assembler well is suggested here.
This RISC-V about sockets is rather neat, to say the least.
This video is a very nice introduction to programming in RISC-V.
Theses series of videos teaching risc-v assembler are spot on.
This page explains things about fprint, and a0, a1, a2 and even mentions floating point operations.
If you want to see a mega assembler code, try this, which seems to give you e.g. Mandelbrot on a plate. And it worked directly on the VisionFive:
Here is a blogger blogging with real code, superb!
This introduction is rather good as it seems to include the very essentials: which are used also in here by the same author.
This document appears to have nice lists of examples of code at the end: with more resources here.
This link seems to be very concise and shows use of fprint.
More RISC-V boards
Another RISC-V beauty.
This site seems to be about the Sipeed Lichee RV RISC-V running under OpenZFS.
The Sparkfun RED-V Development Board has a video review here.
This nicelink is for the gd32vf103.
This link is for the Canaan K510 CRB RISC-V AI development kit.
Another riscv board is mentioned here, which is about the MangoPi SBC.
The above heading was for affordable ones... well ones where the price is known... but one has to mention other ones too even perhaps if the price is not immediately apparent.
SiFive has of course always flogged riscv boards.
Codasip is another riscv processor supplier. Currently seem to be applying RV32IMCB which is apparently RV32I plus M(ultiply), C(ompressed) and B(it manipulation) instruction set.
A pico type board.A really small board.Pine64 board also described here.
LicheeRV riscv board for under $20 runnng Ubuntu. OMG.
Tiny board indeed.Uconsole is a complete mini riscv computer.
D1-H Development board Nezha looks neat and can run Ubuntu apparently, see here.
A development board which looks dinky.
RISC V cores / chips / processors only (not with boards)
A totally random incomplete list.
AX60 muticore processor.
T-Head XuanTie C908 RISC-V core targets IoT.
RISC-V chit-chat
I though this thread about RISC-V was interesting, as was this article about the difficulties of making processors.
It seems that Ubuntu Budgie should work on RISC-V systems , and the Jammy Jellyfish is also reviewed here, as well as here which explains the flavours. Interesting that RISC-V seems not to be mentioned in all reviews, though this one does. RISC V summary to November 2022.
Fantastic advert blocker
Use pihole as your DNS server to eliminate adverts etc. Easy to do on a fritzbox.
Best to use a raspberry pi in a case that does not require a fan, e.g. using an aluminium case. That way no moving parts nor nor noise.
Vodaphone de cable router FRITZ!Box 6591 does not allow one to use pihole as a DNS server. Apparently, the router as rented from vodaphone has this option rendered unavailable.
It seems one can buy the same router from other sources and the required fields to set pihole as the local DNS server are available.
VPN
ProtonVPN is really (really) extremely good. One can even watch UK amazon stuff from Germany using it. Only ever had one problem with the software on a Dell Inspiron running Ubuntu 20.04 LTS, when all internet connectivity was lost. But the solution using
sudo nmcli connection delete pvpn-killswitchsudo nmcli connection delete pvpn-ipv6leak-protectionrm -rf ~/.cache/protonvpnrm -rf ~/.config/protonvpn
was ultra easy and Proton VPN was back up and running immediately.
Freaky thing is that Startpage blocked my IP address when using ProtonVPN.
Hardware eye candy
Just a video showing RAM installation in an 2nd-hand PC. Yawn.
THIS IS GONNA BE A LOADA FUN
See also this page for info on a minecraft server.
Python via web browser
The following is from https://codesandbox.io/s/pyodide-example-mp478?file=/index.html:334-1376 here.
This uses the Python shell which presents the chevron prompt >>>.
Output:
You can execute Python code by entering it in the box above and clicking the button once "Ready" appears.
Try pasting the following 7 lines all at once into the box above (only paste in if 'Ready' is shown):
from itertools import combinations
my_input_list = ["(*A,*Z)","*B","*C","*D"]
l=list(combinations(my_input_list, r=2))
number_of_combinations = len(l)
anded_list = list()
exec("for i in range(0, number_of_combinations): anded_list.append(' and '.join(l[i])) ; anded_list_as_string = ', {not yet done} '.join(anded_list)")
anded_list_as_string
This link gives you a Python compiler.
You can paste the following
from itertools import combinations
my_input_list = ["(*A,*Z)","*B","*C","*D"]
l=list(combinations(my_input_list, r=2))
number_of_combinations = len(l)
anded_list = list()
exec("for i in range(0, number_of_combinations): anded_list.append(' and '.join(l[i])) ; anded_list_as_string = ', {not yet done} '.join(anded_list)")
anded_list_as_string
into the Shell field on the right-hand side in the above link and simply immediately press return in that field (not 'run' button).
The final line of output following
anded_list_as_string
i.e. the text between ' ' in the final line is the new marker item syntax that defines all the combination of marker items from my_input_list.
 2) This link very kindly provided by Bruce Hoult, shown below, indicates the potential way using RISC-V assembler direcly on the vision five, rather than using an emulator. Bruce mentioned "Note that using .S for the file name instead of .s allows you to use the C preprocessor in your assembly language source code. This can be useful for conditional compilation and defining constants and other macros.". He also explained that
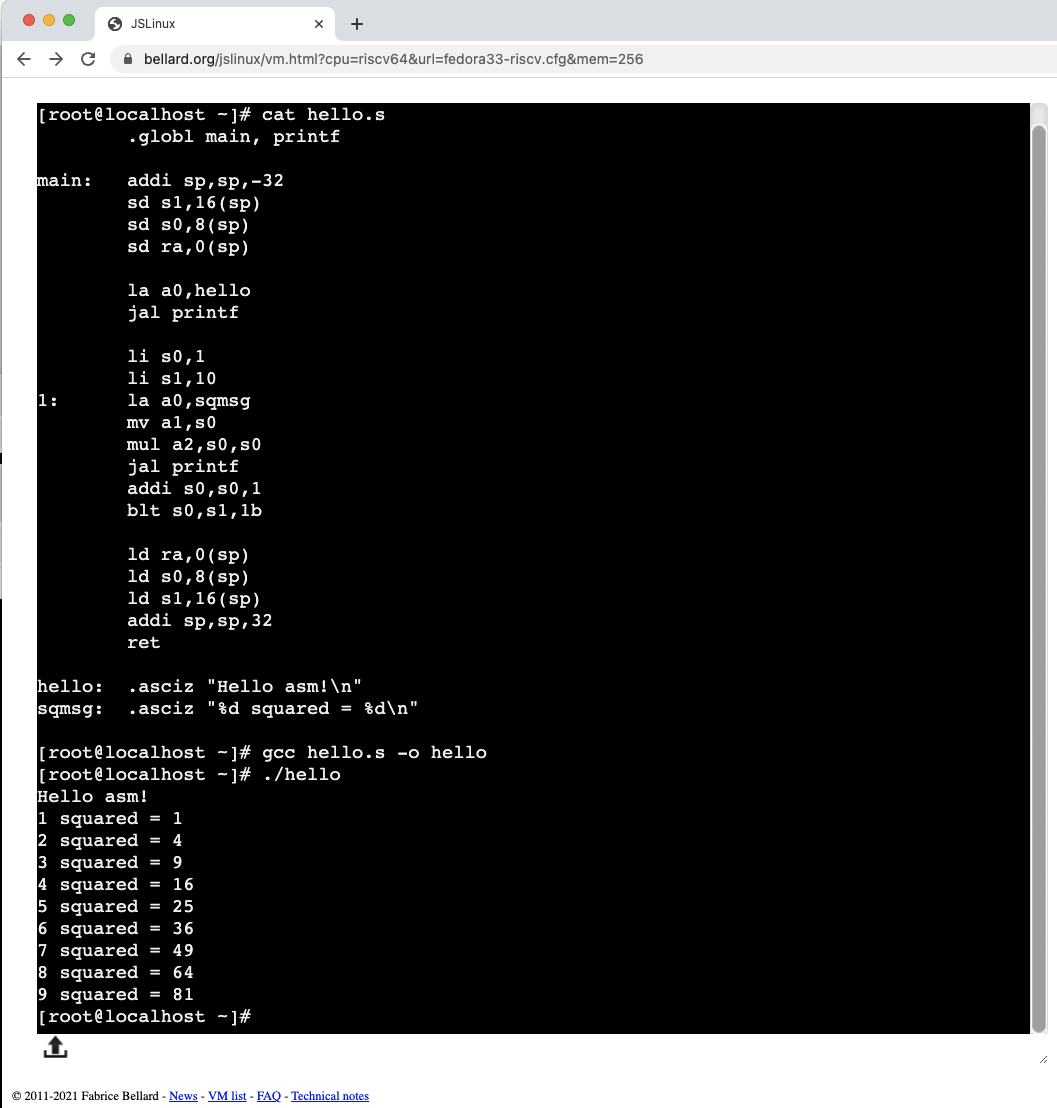
 Lo and behold, the assembler routine above works on the visionfive.
 To run a c program from python is explained in this link.
To time the complied assembler code I use this python file.
The output is shown below.
To run a c program from python is explained in this link.
To time the complied assembler code I use this python file.
The output is shown below.
 A head-to head shows calling compiled assembler seems not to be faster that python directly
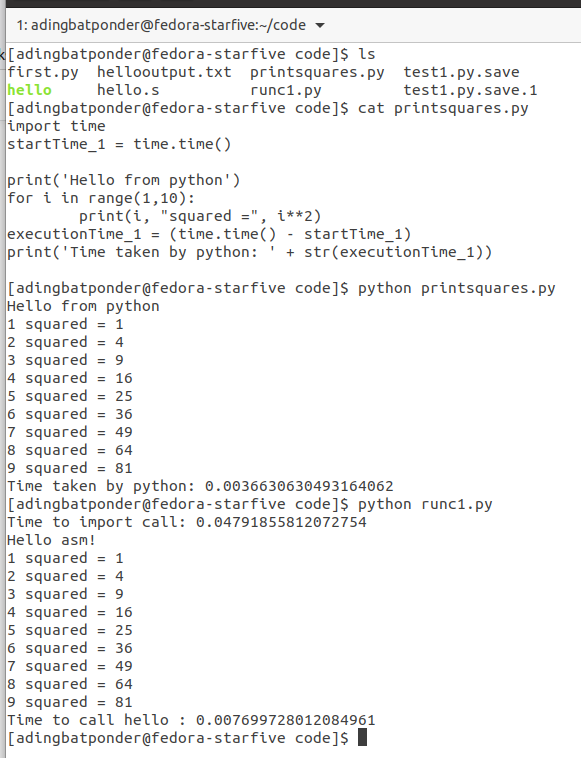 In fact re-running the python that uses a call to the complied assembler often yields about 0.012 seconds, and the python code is never more than 0.0039 seconds, sometimes 0.00066 seconds.
To compare the speed of python in the visionfive with the speed of python in the raspberry pi, see here, which shows that for this the raspberry pi is, as in the above tests, of the order of 10 times faster than the visionfive.
However using the built-in bash
In fact re-running the python that uses a call to the complied assembler often yields about 0.012 seconds, and the python code is never more than 0.0039 seconds, sometimes 0.00066 seconds.
To compare the speed of python in the visionfive with the speed of python in the raspberry pi, see here, which shows that for this the raspberry pi is, as in the above tests, of the order of 10 times faster than the visionfive.
However using the built-in bash 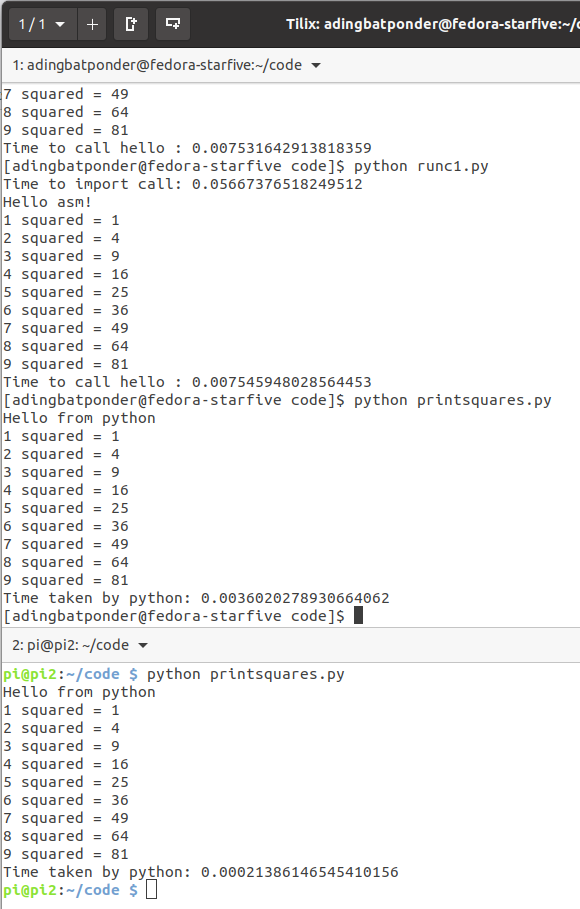
 Further assembly programs are available here and here and here.
RISC-V assembly
Here is a nice RISC-V project site.
Further assembly programs are available here and here and here.
RISC-V assembly
Here is a nice RISC-V project site.  Here is a blogger blogging with real code, superb!
This introduction is rather good as it seems to include the very essentials: which are used also in here by the same author.
Here is a blogger blogging with real code, superb!
This introduction is rather good as it seems to include the very essentials: which are used also in here by the same author.